Thursday, June 7, 2012

An Example of a Marionette

While visiting the Three Baron's Renaissance Faire in Anchorage this past weekend; I stumbled across the most amazing find.  There was a wandering vendor that sold wooden things; among the various items was a single, hand-made marionette.  Overjoyed to see our troupe's next project in front of me and open for intensive viewing, I took out my camera and introduced myself.

Billy's version of Peter Pan, a seven stringed marionette.

I managed to talk with the creator of the marionette for almost an hour and we spent the time discussing all aspects of his marionette.  I tried to glean as much information as possible so that I could work on this next aspect of The Batty Puppeteers.

The Joints

From my closer inspection of Billy's marionette I was able to see how the joints of the legs and arms were pieced together.  While this aspect of jointed marionettes had never eluded me, it was nice to see how somebody else had done it.

The leg joint of the marionette.
The arm joint of the marionette.
From the above pictures you can see that the lower portion of the extremity fits into the upper part.  The two pieces of wood are then pinned together with a small dowel.  Upon closer inspection and a little deductive reasoning, it can be seen that the hole of the lower part of the extremity that the dowel passes through is slightly larger than the dowel itself; whereas the dowel fits perfectly in the holes provided in the upper part of the extremity.  This allows the lower part of the arm (or leg) to move freely back and forth.

This version of Peter Pan does not move his neck about easily; he is quite stiff in that regards (no pun intended).  I tried to take a picture of the neck area but none of the pictures came out well enough to post.  This is something that we would want to examine further.  The Batty Puppeteers' group vision has fully articulated marionettes; so the head would have to move about as freely as any normal actor's would.

The Hands

Traditional marionettes have always had relaxed hands.  It wasn't until the resurgence of marionettes in the mid 1900's that different styles of hands or even controllable hands were used.  However, for a medieval style marionette; the hand structure and style of Billy's Peter Pan is perfect.


The hand design of the marionette, a variation of the popular Czech marionettes.
The hand is in a neutral position and can be utilized for just about anything the marionette may be doing.  Obviously, the marionette may have a hard time picking up items or carrying around a sword; but those small problems can be fixed in later versions of the marionettes that we plan on creating in the future.  For right now, Billy's style of hand is usable for any productions we wish to perform.

Stringing

The marionette that I saw at the Renaissance Faire had a simple string arraignment.  In fact, I was all too familiar with this system as it is what we use on our current marionettes.  Strings control the hands and the knees, two strings control the head movements, and one sting was attached to the marionettes backside.  The "seven-stringed" method is perfect for beginning puppeteers as it is easier to work than the "nine-stringed" method.

The controller was a simple T-shaped controller.  This style is simple and effective but somewhat foreign to me as we operate our marionettes with an "airplane" controller.  However, for his first marionette, Billy's choice of controller was perfectly fine.


The Head

Billy confessed to me that the head was the hardest part for him to create.  From my own experiences of extremely basic marionettes heads, I applaud his skill and ability for what he accomplished.  Using a band saw to finish the main shape of the head, he then took chisel and knife to work out the additional features.  The rough texture to the existing marionette adds medieval feeling to the whole project; which is what I feel the creator of this piece was working towards.

Clothing

The clothing worn by this marionette is made of felt and is not able to be removed from the marionette without detaching the string connection points and roughing up the marionette.  This is the main problem that I see with our own future marionettes.  The plan is to change costumes for different performances and the clothing or string connection points will have to be designed in such a way to allow clothing to be put on, added to, or taken off throughout the lifetime of the marionette.

Final Thoughts

Billy's marionette is a wonderful example of a Phase Three marionette for our troupe.  The whole marionette, from the joints to the head, is a wonderful example of an early style stringed puppet.  The close inspection that I was afforded has given me ideas of where to start and what parts of the process will need to be altered to fit our needs.

Monday, April 9, 2012

Shadow Puppet Stage

After ensuring that there was enough wood in the garage, we started making the plans for the stage.  A lot of research went into this process; and a couple good resources were utilized.  We first had to develop a plan then work on the actual construction.  Ample time was given from concept to finished project so as to ensure that we could fix any problems that we ran across.

Basic plans for a table-top shadow stage.

The Plans

I developed the plans and measurements based on a working design by another theater company, one of which as soon as I find it again I will post it.  The stage dimensions were larger than what I had wanted, so I took the liberty of adjusting the sizes to suit my needs.

Additionally, I found the idea of being able to fold the wings of the stage in to both protect the viewing area and to make the stage more portable to be a good idea.  In both my plans and the plans of the theater company I found online, the wings fold over to completely cover one side of the viewing area.  This helps make the stage transportable and protects the screen during transportation.

The Wood

I used couple of 1" by 4" boards that we happened to have lying around.  I cut them to the measurements I had decided on earlier and sanded them to prepare the boards for staining. 


Staining the wood helps out in several ways.  First, the stain helps protect the wood from minor water damage and getting "dirty".  The second reason is to cover up the dull look of new wood and give the shadow puppet theater a little more class.

This is the type of stain that I used; mostly because we had it and it was a color I could work with.

The wood after the first coat...

I ended up using three coats of stain on the wood frame.  This allowed the actual color to become darker; effectively making a distinctive frame around what would later become a white screen.

After staining the wood, I used a clear Crystal Coat to help further protect the wood.  While the additional coat gives the wood a shiny texture, it does help to protect the wood further in adverse weather.  The Crystal Coat can be dulled using fine sandpaper, which I decided to use.

Construction

Using L brackets and hinges, I constructed the stage.  For the wings, I used 2" flat L brackets while on the main screen, I used 3" flat brackets.  Since the main screen will see the most pressure against it, I decided that the larger brackets would work perfectly.

Since the wood wasn't very thick, and most of the holes were near the edge, I needed to pre-drill a small hole where the screws would go.  After that, I carefully attached the boards together; keeping in mind which boards would lay ontop of others.


The hinges were a little trickier.  I wanted to make sure that the screen folded in on itself and, as such, had to make sure they were all facing the right direction.  After ensuring that the hinges worked the way I wanted them to, I attached the hinges in the same way that I attached the "L" brackets.

The hinge and "L" brackets as previously discussed.

The Screen

The screen is made of white cotton fabric.  The fabric is thick enough so that it is not translucent but thin enough to allow the shadows to play nicely on the screen.  The fabric was cut in one long piece and stapled to the frame as tight as possible.

Making the fabric tight helps to create a crisp shadow and, at the same time, helps to make sure that the shadow puppets do not bulge the screen out when they are placed up against it.

Finished Product

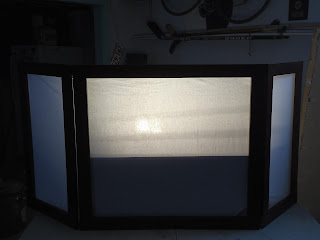
The shadow puppet stage with light behind it.

The addition of a light block behind the screen gives the puppeteer a place to hold the shadow puppet and frames the screen

The shadow puppet theater wasn't able to be used at the event is was planned to be out.  So, instead of shoving it in the corner and digging it out later, I invited the rest of the Batty Puppetters to check out the stage and play around with it.  The results were quite a sucess.

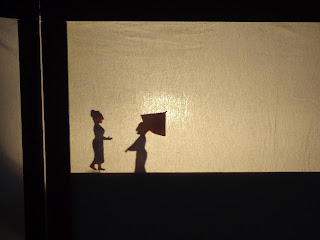
The shadow turn out perfectly for our purposes; here is a woman and a geisha talking to each other.

A samurai.

An example of mixing two shadow puppets; here a japanese devil mask sits ontop of a mountain range.

Final Thoughts

While this stage was constructed with a single purpose in mind, it can be used for further activities of The Batty Puppeteers.  Shadow puppets are very in period of the Society for Creative Anachronism, and I have no doubt that this stage will be used more than once.  Because of its portability; we can take this anywhere we want to go.  The only thing we really have to worry about is a light source.

Additionally, the completed shadow puppet stage can be used by children.  The construction is strong enough to withstand most children so that isn't really a problem.  A shadow puppet stage will also allow children to invent stories and tales so that they have something to do at events as well; something other than play with Monster High dolls.

In the future, I would like to use more medieval techniques of construction; either fitted joints or pegs to hold it all together.  As this stage was a simple construction, I used metal bits that I probably wouldn't use in the far future.  While I have never made joints to put two peices of wood together, I have used pegs and those are easy to do.  Additionally, I would chose to make a leather hinge instead of using the metal ones again; simply for authenticity reasons.

Additionally, the shadow puppets themselves are currently made of cardboard.  In the future, I would like to make thin leather puppets or laquered paper or parchment that are muli-jointed and painted.  Leather puppets can be found in the Far East, and help add to the medieval aura around the stage and paper puppets are just as easy to find.

Wednesday, February 8, 2012

Project: A Shadow Puppet Theater

While I know that a shadow puppet theater has only a few things in common with a marionette theater, I have been asked to create on for a friend's event.  One of the themes for the event is Japanese, and she wanted to be able to have people tell stories using this time-honored oriental tradition.

As with all my projects, I try to complete the research first.  I find that understanding the traditions, stories, and methods surrounding a project make doing something like this more entertaining and educational instead of going out to buy the lumber first.

An example of an elaborate shadow puppet scene.
History of Shadow Puppets

According to popular legend, the history of the shadow puppet originated in China during the Han Dynasty.  The Emperor had lost his favorite concubine to illness and lost his desire to rule.  A minister, often times referred to as a priest in some stories, was inspired by watching the shadows of dolls that children were playing with.  Armed with this amazing idea, the minister created a cotton puppet and painted it to look like the Emperor's favorite concubine.  From there, he performed behind a back-lit curtain regaling the Emperor with tales of his love for his favorite concubine.  Eventually the art form flourished.

It is important to note that shadow puppets are not unique to China.  In fact, the Island of Bali has an extensive cultural history of a unique style of shadow puppets often times used to tell stories of gods and goddesses as well as important historical stories.

The main difference between Balinese shadow puppets and the Chinese style of shadow puppets is the depiction of characters.  These puppets are unique to Bali and can be easily identified due to their style.

A style known as Wayang Kulit; a style mostly used in conjunction with cultural events.

While I have no intention of creating a Balinese style theater yet, it is good to show that there are different styles of shadow puppets from our history.  Shadow puppets, it would appear, are culturally unique even if the implementation is not.

The Research

It is important to note that this project is focusing on the actual stage.  There is currently no intention of creating the puppets themselves.  While this may become an additional project later on, the person requesting the shadow puppet theater has made no mention of creating the props and puppets that would be used in such a production.

I found several good resources on the Internet regarding shadow puppet theaters.  The design itself is relatively simple, and as such, the majority of the resources found are how to create a theater for children.  These resources are still valid considering that the construction and basic parts of the shadow puppet theater are the same no matter what the material or venue; they just require some creative thinking.

A simple shadow puppet theater consists of three items; a proscenium, a light source, and the actual puppets.  The proscenium, similar to that of of our marionette theater, has the opening covered by a cloth that allows light through.  The light source in our project will be a lamp of some sort that can be positioned to throw light onto the back of the screen.  As mentioned previously, the marionettes are not going to be worked on in this part of the project.

The Plan

The first part of the plan is to understand where the shadow puppet theater will be placed.  If it is a "table top" version, our measurements will be drastically different from a free-standing version.  From there, it is a simple matter of developing measurements and  getting the materials.

The next part of the project is actual construction.  A simple free-standing proscenium (no matter what the height) will be one large panel in which the puppets are viewed from and two smaller panels that act as the wings; identical to the front proscenium we created for the marionette theater and discussed in our A Portable Stage post.

Decoration in an oriental style would be desired to help solidify that this stage has a specific purpose and add a unique flavor to the whole project.  Additionally, the wood should be stained or painted as to help lend to the medieval atmosphere of the event.

The last part of this project will be to attach fabric to the proscenium.  Ideally, the use of silk would be used, but the cost of silk is prohibitive to our group.  Linen is the next best choice, and finding a thin linen would be ideal in this endeavor.

Resource Links

Below is a list of links that I found useful.  They range anywhere from the history of shadow puppets to the construction of children's stages.

Chinese Shadow Puppetry
Excellent article that discusses the history of the art form and provides examples of styles unique to the region.

Empty Puppet Stage
A visual of a possible front of a proscenium.  Collected only for the visual idea.

How To Make A Chinese Shadow Puppet Theater
Just a simple resource on the basic construction of the theater.

Sunday, January 29, 2012

2012 Project List

After speaking with the director of our group, I have decided that this would be a great opportunity to post some of our goals and ideas for the coming year.  These goals will be chronicled in upcoming posts, but I need a way to list them out so that we remember what needs to be done.

These projects are intended to help push the group forward, something we as a group need since one of the main driving factors of our group (namely the Director) is away for a year.

Phase Two Marionettes

Moving from doll accessories, namely the heads, and into real puppet pieces is the next step on our list of improvements.  Wooden or paper mache heads might not be the easiest to complete this year, but it is a necessary step if we are to continue moving in the right direction.  We have to remember that the goal is a worthy production, and we can't expect our audience to take us seriously if we still use heads from scavenged dolls.

Currently, the team has very little skills in wood carving, but I have contacted a friend who is knowledgeable in this area.  If the wood fails, we have our back up plan of paper mache, which, I believe is a period technique that might be able to fit the bill.  More research on this idea will be forthcoming.

A Shadow Puppet Stage

A friend has asked us to create a shadow puppet stage for her event in March.  While this type of project was not necessarily our main focus, it will be interesting to create such a contraption.  Further study and creative ingenuity are required to complete this task on time.

The first step is obviously research.  What would a shadow puppet stage from this culture look like?  What types of materials are needed to make it?  And, obviously the most important question; can it be completed in time?

The Guild

While not as important as some of the other items listed above; creating a guild charter and heraldic device can be considered helpful in the long run.  The director's views are important when creating the defining documents of the guild, and will require constant communication to make sure we get it right.

The first steps are, again, research.  By looking at existing guild charters, we can easily see what is needed in the founding documents.  From there, more information can be added to the document to make it workable for us. 

A guild would be helpful in several ways, most notably by encouraging others to participate in our endeavors.  With more people, we can produce more performances and items and move forward into more period styles of performances and artwork quicker.

Blog d'Arthur Revamp

As we progress further and further into our goal, we have found that the need to stylize and freshen up this blog is important.  We want to be able to communicate what we are doing so that other groups can learn from our experiences.  This involves a clean forum of communication and, dare I say, more pictures.

Some people would say to create a website, however, we are not ready for this monumental task at this time.  We have decided to keep up with the blog style until we have enough research and material to make a truly dedicated website to our process, style, and plans.  What we can do is make the blog more user-friendly.

Expect to see subtle changes soon.

Performance Ready

I won't say that we will have a performance within the next year.  What I will say is that we want to be ready.  This task, divided up throughout this year, includes script writing, tweaking the stage, marionette construction and styling, technical aspects of marionettes and stage, and practicing with the marionettes.  It may seem like a very large list, and trust me it really is, but it is vital to our group to move forward (I think I mentioned this several times before).

Friday, January 20, 2012

A Few Good Examples: Beauty and the Beast

Recently, I went to go see the Broadway production of Beauty and the Beast.  While the show itself was fun and entertaining, it was the theatrical magic that captivated me.  Understanding that this was high technology developed with an equally high budget; it is still possible to glean ideas and techniques from this experience.

All we have to do, then, is to render it in a medieval fashion.

The techniques of medieval theatrics, and in this case puppet shows, was usually a very well guarded secret.  Only the troupe which employed the techniques and devices would know how they operated and what they actually were.  This in itself isn't unique, many medieval techniques applied to guilds were secretive, but it does cause problems when looking for resource material.

However, not letting that stop me, I can suppose what could have been used in the time period I am looking at and make reasonable facsimiles without compromising our original goal.

Example 1:  A Front Scrim

A scrim is a commonly used device in theatre.  The fabric has unique properties so that when it is lit from the front the screen is opaque.  However, when the theatre is dark and objects behind the scrim are lit, the fabric is translucent.  While scrims are often used as the backdrop for a performance, in some instances they are used between the actors and the audience.

Looking back at Beauty and the Beast, the stylized front scrim was used for several purposes.  Mainly, it was used to frame a certain part of the story that was important; very much like watching a story book.  Additionally, the scrim was used to add depth to the wooded scenes by projecting shadows on it.  This made it appear that the actors were deep in the woods.  Lastly, the scrim was used for special effects, such as rain.

Now the question is:  Could we use something like this in our performances?  I think the answer is a definitive yes.  A stylized front scrim could be used when performing a fairy tale or an underwater scene.  The trick, however, is not using modern equipment that would normally be used to accent the scrim itself. We would need to find another way to cast shadows or give it the blue hue to make it work.  In modern times, this is done by powerful lighting systems with colored gels; but these things were not available to the medieval puppeteer.

Obviously, this idea requires more research and thought.

Example 2:  Set Pieces

Set pieces are important to have.  They portray the setting in a three dimensional way that a simple painted backdrop cannot.  Additionally, set pieces offer the actors or marionettes a way to interact with the world that has been created for them.

While The Batty Puppeteers has been good about set pieces, we haven't fully realized what can be done with them.  Going back to my experience at the theatre, set pieces had one or two different sides.  For example, the front of a house could be seen and when turned around, the inside could be seen.

Incorporating two sided set pieces would not only help cut down on cost of materials, but help alleviate space requirements for transport or storage.  A castle wall, in this case, could be turned around and become something totally different, like a hedge of shrubbery.

This type of project would be rather simple to accomplish and would require critical thinking on what types of scenery could be grouped together.

Example 3:  Basic Stage Magic

The show, Beauty and the Beast, relied heavily on stage magic.  Thunder, lightning, flashes, fog, and even a magical transformation.  While we are currently developing a thunder machine, how do we incorporate other items, like fog?

This will obviously require more research and experimentation.  We need to understand what could be used for these basic items of stage magic an if they could have been understood by medieval man.  This topic will, undoubtedly, be commented on in further editions of this blog.

In Essence...

In all, my trip to the theatre was a fun experience and I was able to walk away with not only a well told story, but thoughts and ideas of how these items could be incorporated into our own humble troupe.

The whole purpose of any performance, be it actors or marionettes, is to tell a story and have the audience walk away with an experience that they will remember.  It is my belief that incorporating these few ideas that we can achieve our goal.

Monday, December 26, 2011

Stage Magic: A Thunder Machine


This is the first part of a series that explores medieval special effects as used in classical and medieval theater.  From the simple to the extreme, we will explore different examples of mechanical devices that could be used in our modern medieval marionette theater. 
_____

Stage magic in a marionette theater can be done in several ways.  For those who are modernly inclined the use of various technological gadgetry, like stereo systems, iPods, and electric lights; sound effects can easily be used in almost any situation.

But what about our medieval project?  What if we wanted to keep a medieval feeling in our marionette performances but give the audience something more?  In order to ensure that we have special effects without high end technology, we have to do some research and find alternatives to what was used in the past.

Heron of Alexandria

Heron of Alexandria, known as "The Mechanical Man"

Around 100 BC, Heron of Alexandria was busy making inventions; a lot of them.  While much of his time was spent designing "miracles" for temples and weapons, Heron also developed mechanical stage apparatus which varied from the simple to the extravagant.  Luckily, his work has been preserved throughout the ages and we can look deeper into the mind of "the Mechanical Man".

The Thunder Machine

Looking at some of the works of Heron, we were able to find a Thunder Machine.  Thunder would often be used in classical Greek theater whenever a god appeared or left.  Heron's description of the device can be used to make on of our own, albeit a smaller scale.

But what did Heron's machine look like.  Luckily we have a reproduction of one of his drawings so we can look at it in further detail.

Reproduction drawing of Heron's device

Brass balls would be released from a hopper by a lever.  The balls would then roll down a series of shelves before finally resting on a tin sheet.  The sound would be a deep bass tones that would, effectively, sound very much like thunder.
 
Luckily there a few people who have reproduced this machine in modern times, and we can see examples of both Heron's work and the modern equivalent.

Smith College Museum of Ancient Inventions reproduces Heron's work
By contrast, a modern thunder machine; commonly used in modern theater

What Can It Be Used For?

Incorporating the Thunder Machine into our marionette theater could serve several purposes.  For example, the machine could be used for dark and stormy nights, the sound when the devil appears (or other nasty characters come on to the stage) or even for when a marionette casts a spell or breaks a curse.  There are many different ways that thunder could be appropriate for any number of marionette performances.

Final Thoughts

When The Batty Puppeteers creates this contraption, we need to be aware of the size issue.  Unfortunately, we have limited space when we perform our shows, so the Thunder Machine cannot take up a lot of space.  We will need to explore and experiment with different sizes to find the smallest size we can go while still getting the deep sound we desire.

Wednesday, November 30, 2011

Inspiration Found Online: The Puppets

Let's get inspired, shall we?  After looking around the Internet for resource (more on that coming soon), I have found several videos and pictures of marionettes and productions that I have found absolutely inspiring.

The Rose Marionette


While built in 1942 and not a medieval marionette by any stretch of the imagination; this marionette shows amazing human body expressions.  Notice the intricate body movements that make the marionette appear to be a real person.  The Rose Marionette is a gorgeous example of stunning craftsmanship.  When I envision our plans for Stage 3 marionettes, this is what I see.

While I am sure that the controls are modified from the basic "airplane" style, it is the joints that help add to the realism of this marionette.  Notice how the head moves forward, back, and from side to side.  Additionally, play close attention to the hand movements and how the wrist joints work to create the illusion of reality.

How The Marionette Comes Alive


An amazing example of how wooden marionettes are created, from conception to stringing.  While The Batty Puppeteers are not at this stage of construction yet, however, this video makes a welcome addition to the inspiration list.

Note the control mechanism and how the joints are created; it looks like they were pegged with wood, a concept that I never put a lot of thought into until now.  Although the clothes are sewn directly onto the marionette (a technique that The Batty Puppeteers may or may not do), the whole video shows what needs to be accomplished and in what order to create these Stage 3 marionettes.

Marionette, Italian c1500 by Matheus Bane


This descriptive write-up on Italian rod puppets is full of inspiration.  The author goes into moderate detailed research on types and styles of marionettes, and documents his creation of his rod puppet.  The real treasure is in his notations on the creation of the rod puppet itself.  Additionally, the detailed images of the joints of the author's rod puppet is a good option to incorporate when working on additional marionettes in the near future.  The link to his article can be found here (PDF).

Popular Science:  The Art of Making Lifelike Marionette Bodies (Feb, 1936)


This was a find that completely astonished me.  Back in the 1930's, marionettes made a huge comeback in America.  As such, the vast majority of resource materials, such as "The Beaton Bible", come from this time period.  The article encompasses a lot of information from construction to stringing and is a good source of inspiration with all of the pictures supplied.   The link to this article can be found here.

Inspired Yet?

I know that I am.  The goal is to progress to the next level; to develop and create an intricate marionette that is pleasing to the eyes and functional.  Observing what other people have created and catching glimpses of how they do it will further my ability to create the next level of marionettes for The Batty Puppeteers.